Converting LPs and Audio Cassettes into a Computer Juke Box
1. Introduction
2. Choosing a Compression
Format
3. Directory
Structure and File Names
4. Importing CDs using Nero
5. Importing CDs using iTunes
6. Converting LPS and Audio Cassettes in
to a Computer Juke Box
Recording from an analogue
(non-digital) source is in real time. A record that has 26 minutes on a side
will take 26 minutes to record that side, several minutes to save as a wave file
and longer to convert to MP3. If you record each track one at a time the process
becomes more hands on and slow.
You could search Amazon and eBay and the internet in general for a CD version of
the album, or iTunes for a downloadable version. With a CD you can get perfect
importing to the computer in a few minutes and sell the CD later usually only
costing you the price of postage. You could also rent from the local library at
a modest cost. As you still have the original album, as a vinyl LP and you are
doing this as a back up for your personal use you may not even be breaking
copyright laws; although not all CD versions of an original LPs have the same
track order or tracks and may be re-mastered.
Not all LPs have been converted to CD format and even when they were they may no
longer be current or findable as a CD. You have the album, it is just a matter
of recording it to the computer.
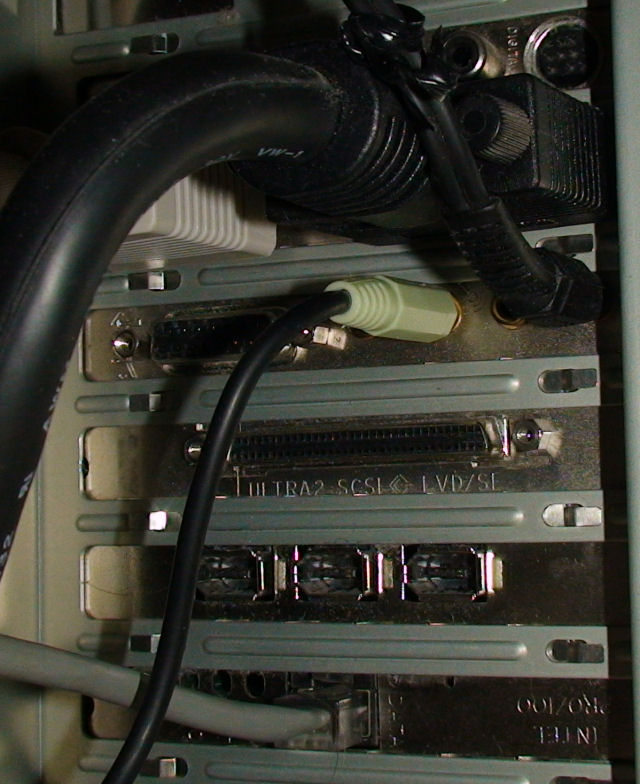
The sound card or onboard audio on a computer will have line input, microphone
input, line out and speaker output. Line out is usually used for speaker output
to active speakers. The microphone input is not suitable to use as line input.
Sometimes, particularly on laptops this may be the same socket but muting mic
and selecting line in will then have the correct input levels for the recording.
If you have a hi-fi system you can connect the cassette line output from the
amplifier to the line input on the computer. This may require a 3.5 mm stereo
plug to left and right channel RCA phono plug cable. If you want to monitor the
recording on the same hi-fi you will need a second cable from the 3.5mm mini
jack line output from the computer to the tape input on the amplifier. The green
plug on the back of the computer above goes into the speaker socket of the
computer monitor. Some amplifiers, particularly
older British and continental equipment use 5 pin DIN plugs. You also need the
cable long enough to connect the computer to the amplifier.
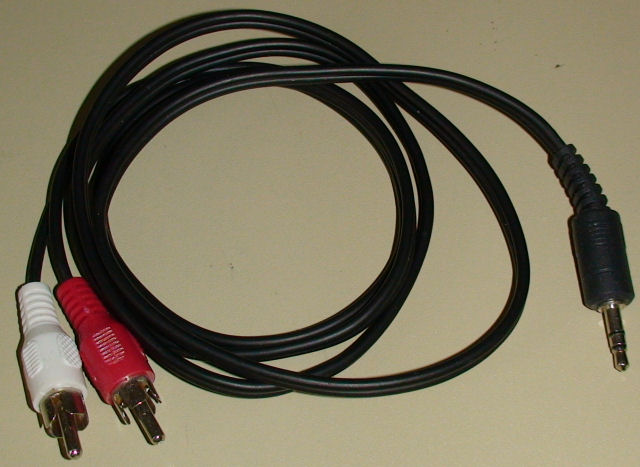
Use high quality cable that are well made and not been damaged. The transfer is
a time consuming process, there is little point defeating the quality with
cables that are damaged or do not make a firm connection with the sockets on the
computer or hi-fi. Long cables may introduce hum and signal loss requiring
additional amplification.
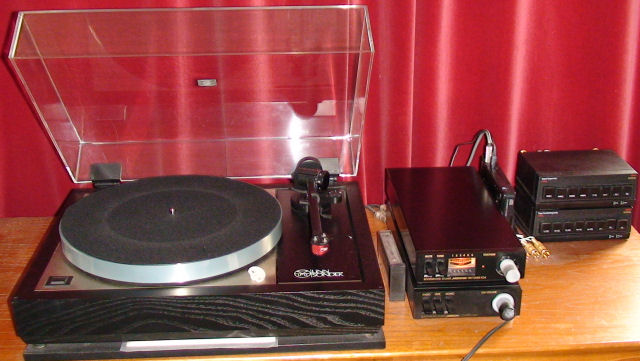
Connecting a Turntable to the computer
A pickup cartridge fitted to a record deck is usually moving
magnet (MM) or moving coil (MC). The line output is feed into the phono
preamplifier which is built into a hi-fi amplifier. You can not feed the
turntable directly into the line input of a computer with a cable adapter.
Moving coil cartridges are more
expensive than moving magnet and their output level is much lower although you
can still get some output into an amplifier that only accepts moving magnet. If
you already have a working turntable and amplifier you do not need to get any
addition hardware beyond the need for a cable from the tape output to computer
line input. Most amplifiers do not have moving coil (MC) options and will only
work with moving magnet (MM) cartridges. You can plug in a turntable with MC to
an amplifier with MM input, but the level is one-tenth and not useable. If you
plug a turntable with MM into an amp with MC you will overload the amplifiers
circuit. An even older type of cartridge is a ceramic one, which outputs could
feed the signal directly into a computer but is inferior in quality to MM and MC
cartridges.
Some shops (e.g. Maplins) and other
internet stores (Firebox) sell turntables with USB connectors that allow you to
play a record and to record it with the supplied software. Although these do
make the task simpler they are not high quality decks and a second hand hi-fi
turntable may cost you less and result in a better recording.
In the 70s and 80s a really cheap,
excellent quality and popular turntable was the Pioneer PL12D. These can be had
for £20-40. A nice bonus is the 45 rpm adapter for singles taken from juke boxes
that have had their centres pressed out. Add a NAD 3020 amplifier, for the same
money, and you have a system that is far better than the computer interface
turntables.
You can even consider funding a top
quality deck, setting you back hundreds if not thousands and resell it for
little loss, if any, a few months later having completed the transfer. A Rega
Planar 2 or 3, Michell, Linn Sondek or one of the other top model record decks
which may cost £400-£2000 retain their second user value very well over a few
months giving you time to complete the transfer of all your albums. Cartridge
replacement is possible either second hand or new but it is worth while getting
confirmation on the condition and usage of the cartridge first. A top quality
deck may need a service. A Linn service by a dealer costs about £80 and you are
then confident that the deck is performing to it's best advantage.
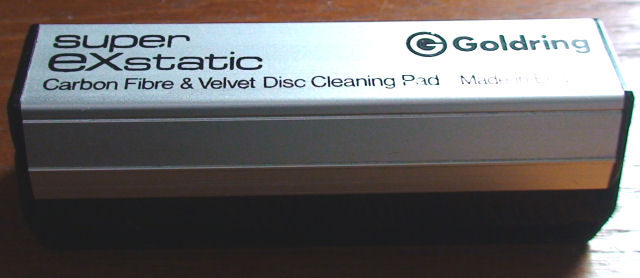
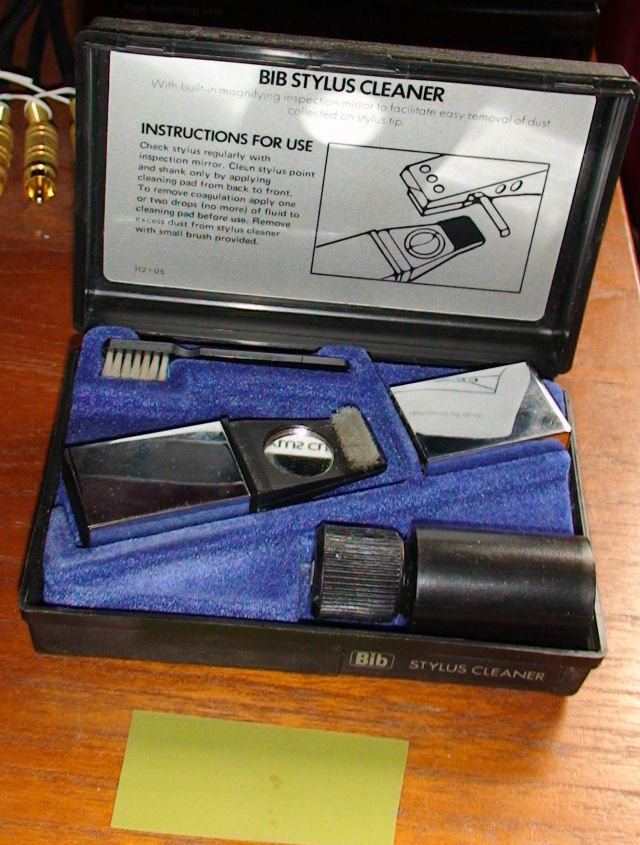
You will also need a quality carbon fibre brush to remove any dust from the
surface of the record before playing.
A needle brush is also useful to safely remove dust collected from the record
whilst playing
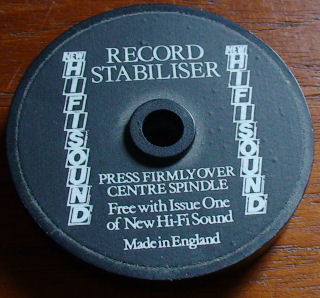
Some records may be warped from storage. This accessory helps to force the
record flat.
Connect the turntable to a phono amplifier or the preamplifier or amplifier of a
hi-fi system. A phono amplifier may have sufficient output to feed directly into
the computer's line input.
If you have to move the turntable remember that the same considerations to
positioning and set up apply, namely the turntable must be completely level and
should not sit on top of a "sound box" like a side board unit or cabinet. You
also have to make sure that you avoid the risk of knocking the turntable or
support. Do not position the computer keyboard on the top or next to the record
deck. Even moving around the mouse on the same surface could make the needle
jump. In transferring you are about to "fix" the audio quality for all your
future listening. Dust on an LP is not likely to be present on the next replay
and the odd pop and crackle may not detract from the listening experience.
Having recorded a pop from dust you will find this fixed and anticipated each
time the track is played. You can always apply filters later and just for the
affected scratch, static or dust.
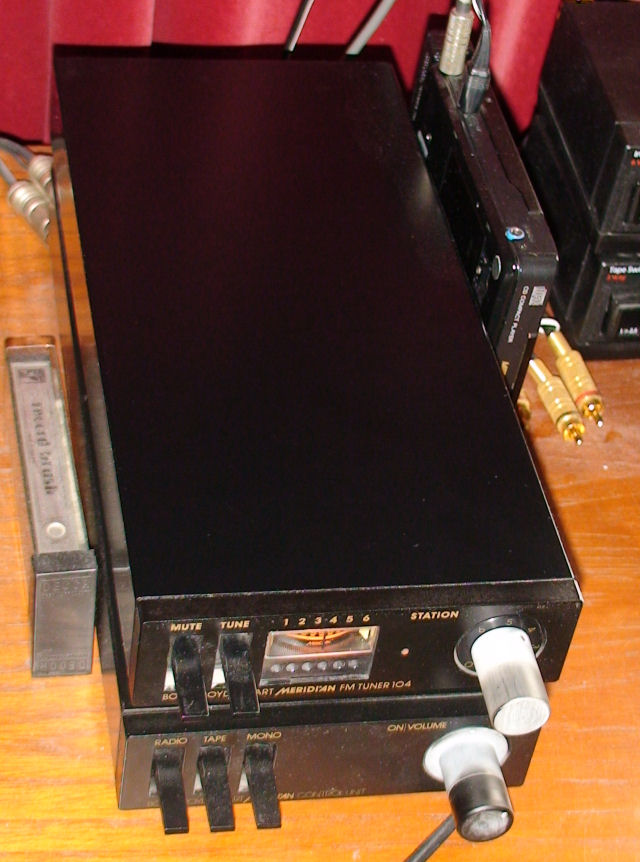
A top quality British amplifier with MM and/or MC inputs from the likes of
Arcam, Linn, Meridian, Mission, Naim, Quad and Rega similarly can be purchased
and resold or put to good use powering the speakers with the input going from
your computer juke box. Failing this you will need a phono stage pre-amplifier
to bring the RIAA EQ level output from the cartridge to that of the
tape/cassette level. The Terratec's Phono pre-amp iVinyl connects directly to the
computer via USB. A quality hi-fi phono preamp is more flexible and might be
resold with the turntable to someone with a vinyl collection.
Connecting a Cassette Deck to the computer
The output on a cassette deck or hi-fi tuner are compatible with the line in on
a computer. These do not need a hi-fi amplifier although the amplifier's tape
output could still be used.
You could also connect the ear
phone output of a cassette walkman with 3.5 to 3.5mm stereo leads to the
computer making sure that the output level is high enough but low enough not to
distort. Line level inputs are better as they are at a fixed output level.
Firebox also sells a cassette tape
player called the Plus Deck Cassette Convertor that fits inside a PC, using a
spare 5.25" drive bay. There are also external USB cassette decks. These lack
bias and equalization switches or Dolby section.
Many commercially made cassette
tapes are recorded using Dolby B on Ferric or chrome tapes. Personal recordings
may be Dolby B, Dolby C or Dolby S. Use the original deck that recorded the
tape, or the best quality deck you have for playback.
You may even find that you prefer to switch off Dolby completely or have it on
even for tapes that were recorded without Dolby B. Let your ears be the judge.
If in doubt opt for using Dolby B only on those tapes that show the Dolby logo
or you recorded yourself in Dolby. Do not be fooled into thinking a recording in
Dolby is better with Dolby switched out just because this seems louder. You can
adjust the record level but removing hiss and background noise, which the Dolby
circuit has done is hard to apply after the transfer.
There are four basic tape formulations used in home recordings:- Ferric,
Ferrichrome, Chromium dioxide and metal. Ferrichrome and Chrome tapes share the
same equalization but have different bias properties. Many decks do not give you
the choice and have bias and equalization on one switch. Many machines sold had
poor replay azimuth and were not adequately set up for any of the tapes sold.
After the machines where reset for a tape like TDK AD and SA the recordings and
playback where much improved. Many of the top model Aiwa and the decks from
Nakamichi have variable controls to set the bias. Although more important for
recording than playback the more flexible the deck the better chance of
optimising the playback quality of what you have.
All my home recordings, including concerts, school events and from telephone
conversations are in Dolby C. Most of the commercial tapes, even from the BBC,
do not show the Dolby logo.
It is better to use a deck that can select Dolby B, C or S (a much later and
less common noise reduction system) and Ferric, Chrome and metal tape equalization. Do not transfer
cassette versions of your vinyl as the LP is of a far higher quality than a cassette
transfer provides. Radio programmes and recordings of live events are different.
You might even find telephone recordings and answer phone messages that may be
worth preserving even if the quality is not very high.
Second hand decks worth looking out for include virtually any from Nakamichi
(£100-£1000), some Aiwa models that offered high quality for little money (£25
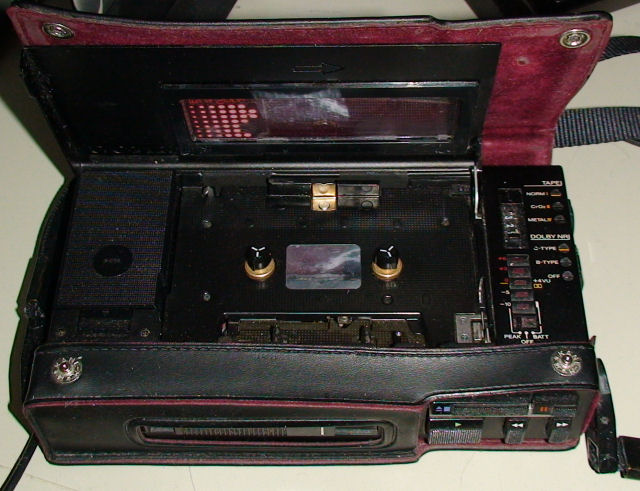
up), Arcam (for Dolby S and one of the top designed decks made), Uher CR240
(Dolby B) or CR160 (Dolby B & C, not metal), Sony Walkman Pro WM-D6C (Dolby B
and C and metal tape). The Sony uses a 3.5 mm stereo jack for line output.
The Uher decks are portable pro equipment and can still be serviced today. They
are very robust and flexible machines. The Sony Walkman Pro is an exceptional
hi-fi deck and has retain a strong following. Prices second hand are high, but
resell very good. You need to know the condition of the playback head and
possibly need to invest in a head cleaner and also head demagnetizer. Sony
Walkman Pro were sold over a number of years with minor internal changes. These
can still be serviced, but Sony are now charging very high inspection fees on
all of their equipment compared to the more reasonable charges made by the now
closed Sony Service Centre a few years ago.
If you have reel to reel tapes you first need a deck that supports the reel
size. It is a lot of work to transfer 10" reels onto 5" ones because you only
have a Uher reporter available. The next problem is to know whether the tape is
mono, dual sided mono, stereo / 2 track or dual sided stereo / 4 track. The
recording may also have been recorded at any speed from 1 7/8 inches to 15
inches per second or even a pro 30 inches per second.
Software
Some software will remove pops, crackles and static, but this usually results in
changing the sound quality as well. Experiment and decide for yourself. You can
separate tracks later. Some software will do this automatically but you still
have to type in the track names.
As I personally do not listen to single tracks from albums and most audio
cassettes are either collections for the car (which I do not need to transfer),
albums or off air radio programmes I store only the entire side of both vinyl
and tapes. These are then make 2x 250-400 Mb files for an LP. Cassette quality,
even with live recordings with a good quality microphone is inferior to LPs and
so most of them I record and save as MP3 at 192 kbits instead of saving as a WAV
file.
For vinyl and audio cassettes the free program Audacity is a simple and robust
application that controls the input recording level, the output monitoring level
and creates wave files or MP3 files. A number of filter options allow the
removal of hiss and pops from records. Many of these filters also remove the
quality of the music but are perfect for the silent and quiet passages.
Owners of Creative Sound Blaster cards or Ulead Video software have similar
options of recording WAV files, but not all versions convert to MP3, so a
separate package to convert to a compressed audio format may be required.
Nero 7 comes with Soundtrax2 which records music from cassette or vinyl then
copies the result to CD.
The built in audio hardware of modern motherboards is much better than it used
to be. Some PCI cards have an un-acceptable level of back ground noise. One
leading sound card picked up the activity from the SCSI controller of the hard
disc recording pops every time the drive was accessed and alternative card from
the same manufacturer had no problems. The same card in two computers with the
same mother boards had different characteristics. One was useable the other too
noisy. There are external boxes that take a line level input and connect to the
computer via a USB socket this removes the circuit noise and hum that may be
hear when recording or playing back from the computer's sound card.
I use an old Pentium III system with a Sound Blaster Live PCI card connected to
a Meridian 101B pre-amplifier (purchased in 1978). This has the quietest noise
level and matches the very latest computer hardware which I use at the same time
for the more intensive video conversion. A computer like the P3 system can be
picked up for under £50 and sold later for nearly the same money or even
obtained free from Freecycle, The Meridian pre-amp sells for £80-150 at auction,
more than it was when new. A quality phono amplifier or integrated amplifier
with phono inputs will cost at least as much.
CDs are transferred digitally. The computer will apply error correction and
reread the track until it is read or determines that it is unreadable and give
an error. A better quality drive may track and correct better but the difference
is likely to be negligible. The same does not apply to record and cassette
decks.
The higher quality the source is the better the recording. Dust vinyl records
with a good carbon fibre cleaner to remove surface dust. Clean cassette heads
regularly and check the cartridge and record heads of the tape machine or get an
expert to do so. It would be very frustrating to have recorded all the LPS only
to find that the turntable's speed was slightly off and you didn't notice
because you had the sound level down and was concentrating on the transfer, not
sitting back and listening to the album.
My sources are a Linn Sondek with an Ekos arm and Troika cartridge, a Uher CR160
professional portable cassette deck and a Sony WM-D6C Pro Walkman.
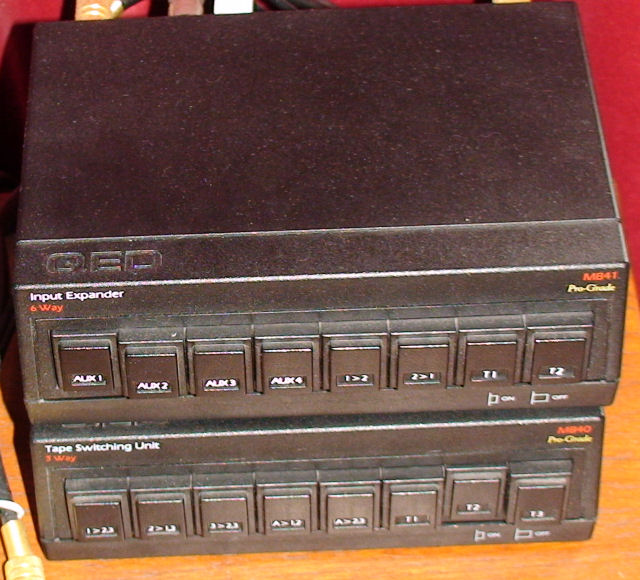
Some amplifiers have DIN plugs, like the Merdian 101B I am using. You may have
to make up a connector yourself. I have the tape output fed into a QED expander
and connect the computer to this.
Otherwise connect the computer to the tape output of the amplifier. Most
amplifiers use phono plugs for left and right channels. A cable with two phono
plugs on one end and a 3.5mm stereo jack on the other will connect the
amplifier's tape output to the computer's line in.
Check with the Windows recorder that line in is working and that you can hear
the record playing through headphones or the computer's own speakers and that
you can set the recording levels fully.
Some records have very high peaks that can overload the line input resulting in
clipping when the recording is played back. Monitor the loudest passage of the
album and set the recording level so that it does not clip.
Some computers have sound card software that shows a peak meter that goes red if
the level is too high. If you don't have this use Audacity to see the wave form
and make sure there is some head room.
Some recordings are very low, particularly on tape. You can change the recording
level but this may also increase the back ground hiss of the electronics.
During the recording make sure there is no application running that will pop up
or load. Outlook 2007 still runs mail notification so you may want to remove the
accompanying beep. Although the recording of audio is not so intensive as video
you are unlikely to be able to make successful recordings if you are loading and
running other applications at the same time. For certain, any intensive file
transfer going on in the back ground will interfere with the recording.
Using Audacity to convert tapes and vinyl to MP3
Audacity is an excellent free tool from http://audacity.soundforge.net. You will
also need the Lame mp3 encoder.
When you have downloaded and installed Audacity you need to make a few changes
in the preferences. The playback and record devices need to be selected and
stereo (the default is mono).

Under file formats you will also need to tell it where you have stored
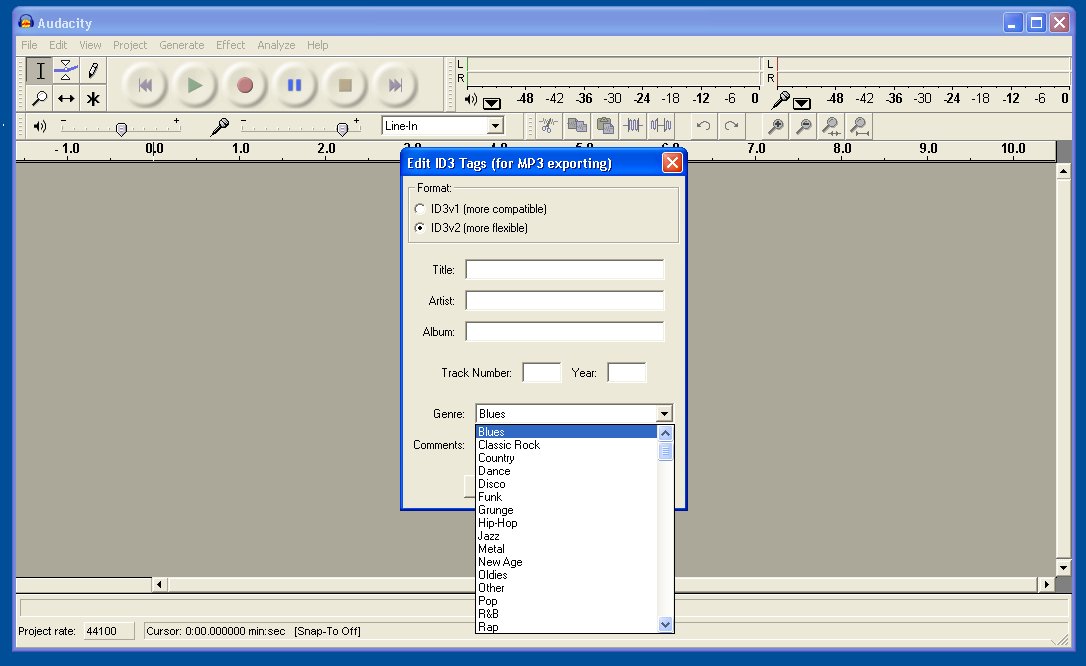
lame_enc.dll and the preferred data rate for MP3 conversion. Before recording,
or before saving a file as MP3 you can enter the title, artist and album
information and select the genre from the pop down list. Unfortunately you can't
change the options either by removing those you do not need or adding in ones
that you do. Most music genre are included. There are tools that can edit the
MP3 files later.
There is a slider to set the level of the line input and you can monitor this by
the during recording as well as observing the wave pattern and so lower or raise
the recording level to avoid clipping yet to give the maximum output level.
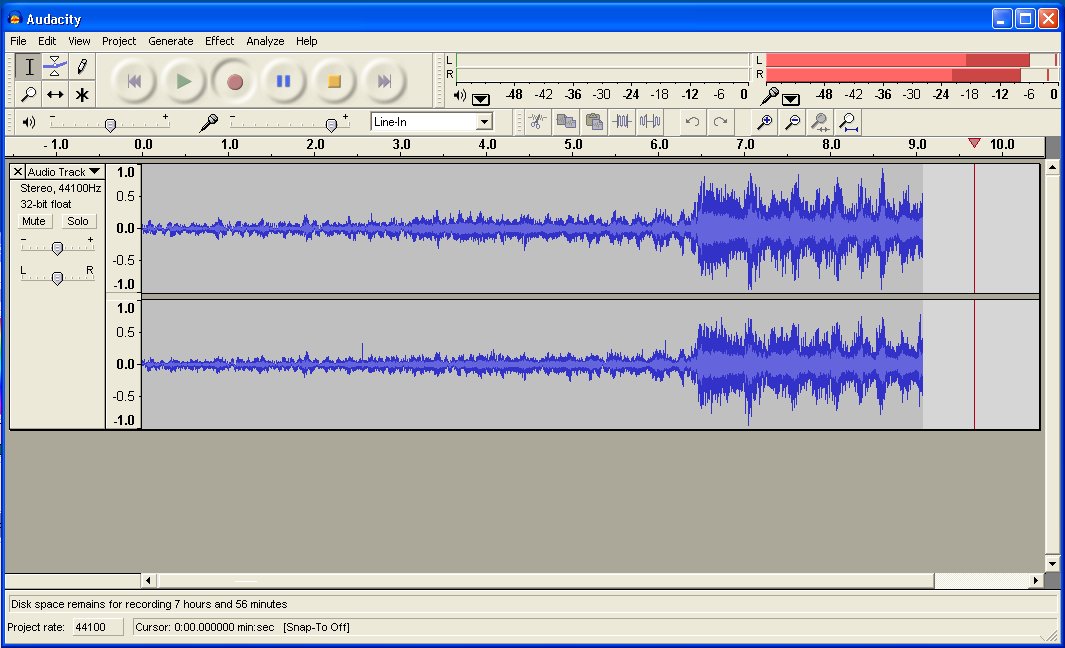
You can press pause to change the side of the cassette or LP. Hit pause again to
resume recording. Once you have recorded the album hit stop. To select the whole
audio press Ctrl A then click on the effects menu and select Normalize. Click
OK.

If you would like to remove some noise from the recording such as back ground
hiss and rumble find a blank section between two tracks and use the cursor to
select it. Click on the effects menu and choose Noise Removal.
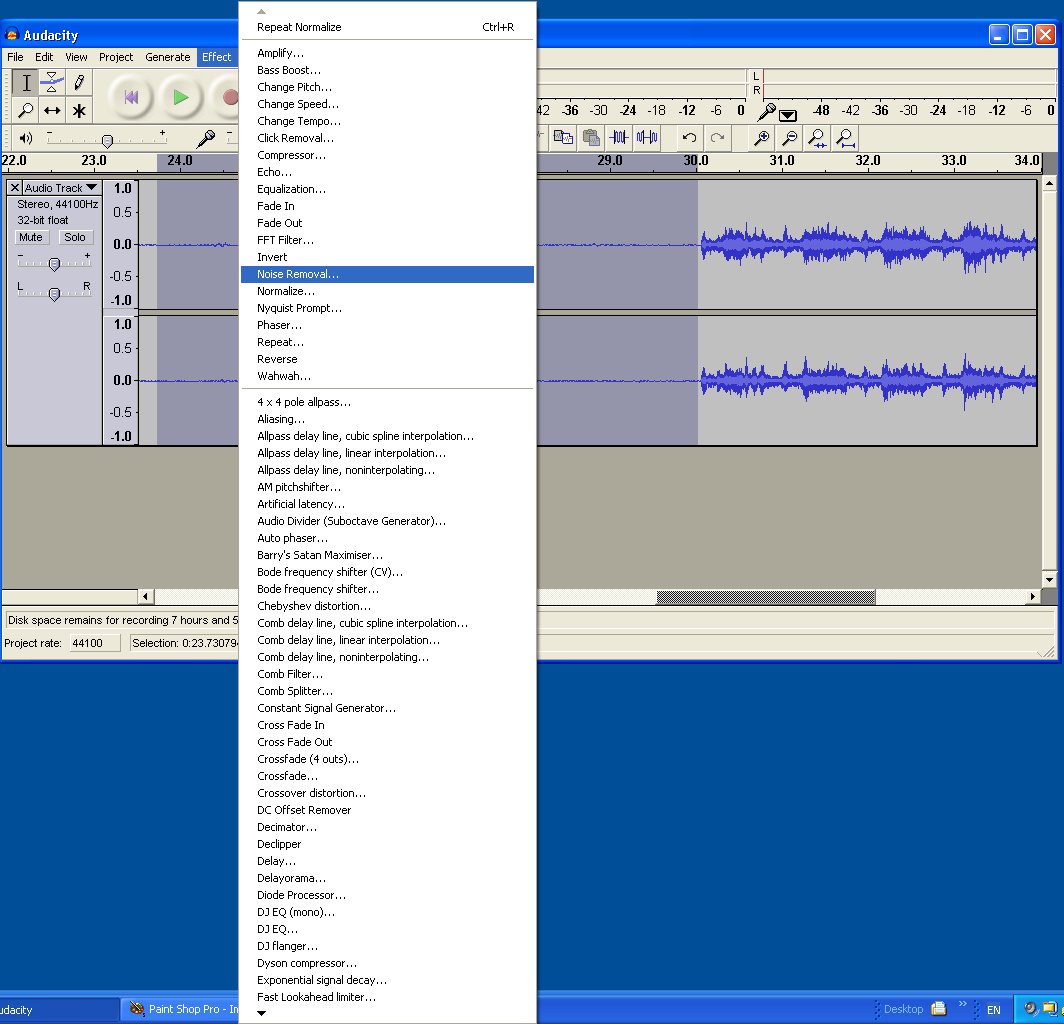
Then click on the Get Noise Profile Button.
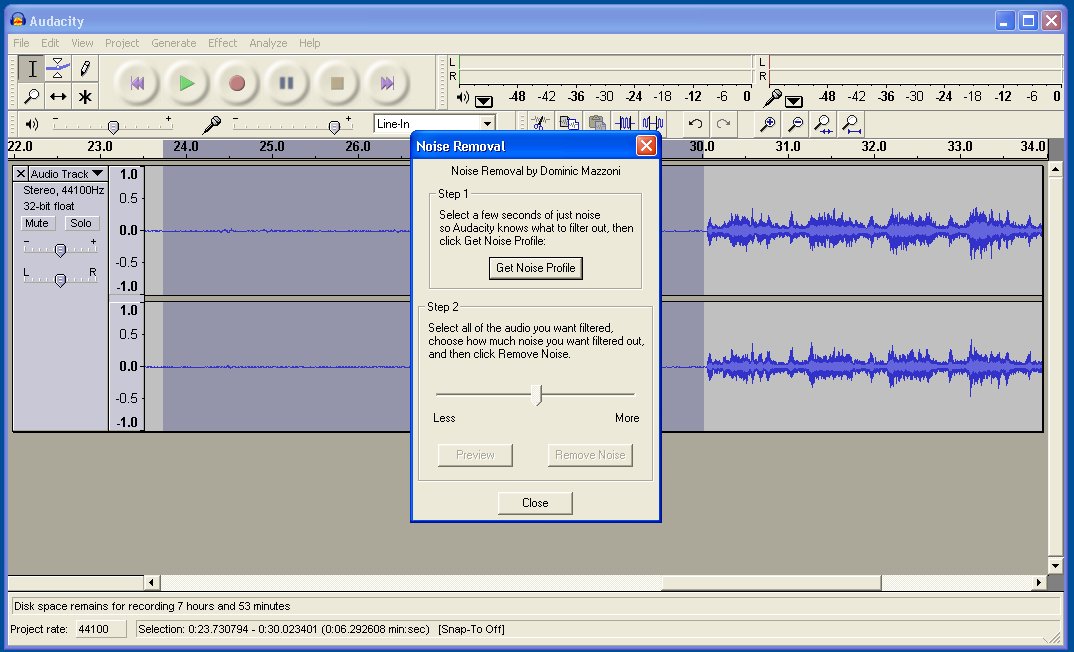
The noise reducing plug-in will disappear so you can select the area of the file
you want to process. Ctrl A to select the whole file, click on Effects menu and
Noise Removal. Move the slider to the right and click preview to hear the
results. Keep doing this until you've found a setting that removes the noise but
doesn't leave the recording sounding artificial. Click OK.
To split up the recording into individual tracks click on the audio and place
the cursor at the start of the first song. Choose Add Label at Selection from
the Tracks menu. Enter the song title as the title of the label. Repeat for each
track. When you have labelled the tracks click on the file menu and select
'Export Multiple'. Choose MP3 as the format and click Export. Click Done to
save.

Album covers, sleeve notes, booklets
LPs covers often include sleeve notes and lyrics as well as
the play list with composer, lyricist and musicians. The 12" LPs can not be
scanned with an A4 scanner and will need to be scanned left and right and the
images merged later. Although this is not a difficult task and applications like
Paint Shop Pro can be used to help it is still a slow process. You may also find
that the two part scanning leaves the two images with a different colour or
brightness and so joining them together seamlessly is difficult.
Scan at 300dpi.
You can always elect to batch convert to a small resolution later. 300dpi avoids
most of the faults in scanning at a lower resolution and does not take up as
much space as 600dpi scans require. Printing, if you should ever wish to do so, from
a 300dpi scan is fairly close to the original.
Last updated 1st September 2008